#using free video editors with limited functions
Explore tagged Tumblr posts
Visit Tumblr Blog
Explore Tumblr blogs with no restrictions, modern design and the best experience.
Last Seen Tumblr Blogs


Fun Fact
In 2020, 44% of users from Denmark used Tumblr daily.
Text

what if i started making amvs at my university
#the thing is. if i make a video edit its not password protected or anything. everyone can go into my folder and see it. and i would not#survive that. but also. who would see it. why would anyone check out my folder#see my problem here??#i just checked out some of the features the editor can do and holy shit its so cool and im already so spoiled by using it for simple videos#anyways. back to work on my amv in my free video editor lol#if anyone knows ways to get a good (probably not free) editor. like. cheap. if you know what i mean. please tell me lol. im so tired of#using free video editors with limited functions
2 notes
·
View notes
Text
vero's super secret 🤫 google drive of anime
sharing is caring and i have some unused google drive space so i will be uploading some of my favourite anime for anyone to download 💞
note: subs usually don't work in google player/preview, you will need to download them to your device! for player i recommend using VLC (for any device).
rules:
the folders are set to editor permission because that is the only way video files can be downloaded. please only use the download function, do not move/delete/edit the files!
do not share on other platforms publicly! sharing privately is okay, but do not post it on any other social media.
as i only have the limited default space (not gonna pay google lol), the shows uploaded will change. by default i will leave them up for at least one week, but if you want to download it, make sure you do as soon as you can, before another takes its place.
let me know if there is an issue with the files or if you accidentally edited them. i won't be actively monitoring the folders, and i might need time to fix any issues, as im only doing this in my free time.
i'm not taking requests, im only sharing what i already have/will have. if i'm unsure what to upload next, i will put up a poll.
main folder • currently uploaded (13th Jan):
trigun stampede - post with details
sk8 the infinity (ova included) - post with details
enjoy <3
59 notes
·
View notes
Text
SRWE or AI? Best Ways to Upscale Sims 4 Screenshots
Are you also tired of seeing social media mercilessly crush your The Sims 4 screenshots? We’ve tried every trick in the book to keep our pics crisp – SRWE, AI upscalers, you name it – and now we’re ready to break down how to save your favorite sim’s photos from pixelation, quick and easy. In this article, we’ll explain (no tech jargon, promise!) what actually works, plus share our hands-on experience and top tips.
Your upscaling method depends heavily on the source image and the look you’re going for. We all have different ideas of what makes a sims beautiful – some love natural textures, even slight skin imperfections, while others prefer flawlessly smooth, hyper-sharp results.
We’ve tested different upscaling tools to help boost your screenshot quality. But to find your perfect match – the one that makes your shots look just right (by your standards!) – we recommend trying a few yourself.
You can enhance screenshots both before and after saving them! We’ve covered both approaches, so pick whichever suits you best.
Before Saving the Screenshot: SRWE (Simple Runtime Window Editor)
This tool is well-known in The Sims 4 community – there are tons of YouTube tutorials covering it. When it comes to improving image quality before taking a screenshot, SRWE is one of the first solutions that comes to mind.
It works by bypassing Windows' DPI scaling, allowing you to capture screenshots at a higher resolution without blurring.
Pros:
— A fantastic tool: it delivers the exact same image but in much better quality.
— No conflicts with GShade/ReShade: your presets will look exactly as intended.
— Free and easy to install, no hidden costs or complicated setup.
— No post-processing needed, preserves original texture and UI quality.
— No extra plugins or presets required, works right out of the box.
— Great performance even on low-end PCs. If your computer can run GShade, SRWE will work just fine.
Cons:
— Limited functionality.
— Some users find SRWE a bit tricky to set up (though we personally disagree).
Now, let’s break down how to use it and what results to expect.
If you prefer a video guide, check out this link for a detailed walkthrough by Chii.
Step 1
First things first – you'll need to download the program itself. It's available for free on GitHub – you can grab it here.
There's no real benefit to getting the version with pre-configured profiles, so just download the standard version without profiles.
Step 2
Extract the files from the archive.
It doesn’t matter where you store them on your computer – it won’t affect how the program works.
Step 3
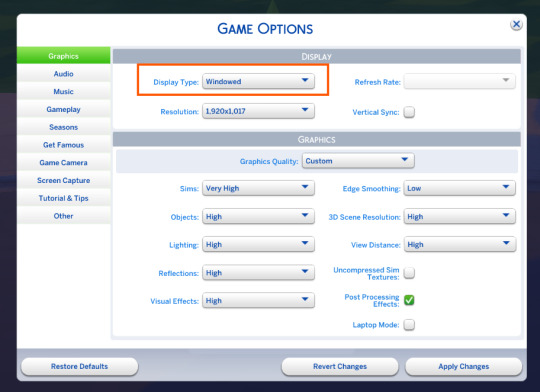
Now it’s time to launch the game and switch from fullscreen to windowed mode in the settings. You can also do this with the Alt+Enter shortcut.
Step 4
Set up your shot exactly how you want it. Open the location, pose your sims, apply any presets if needed. At this point, you can take a regular screenshot (for comparison) using your usual method.
Step 5
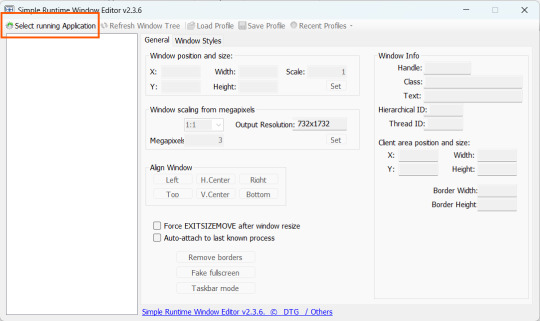
1. Go back to the SRWE folder.
There are only two files inside – one of them launches the program (no installation needed).

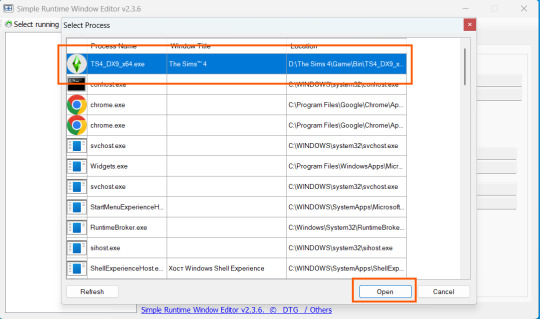
2. In the window that opens, select The Sims 4 from the list.
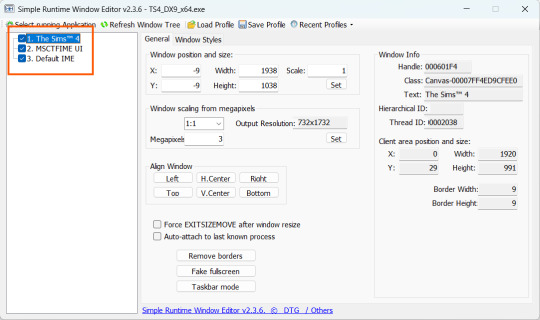
3. Check all the boxes.
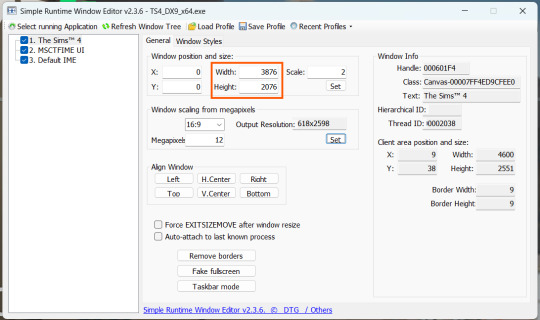
4. Image Size
You can set your screenshot size in a few different ways:
— The easiest method: Multiply your current resolution by the desired factor. For example, to upscale 1080p to 4K, multiply by 2. Tap Set.
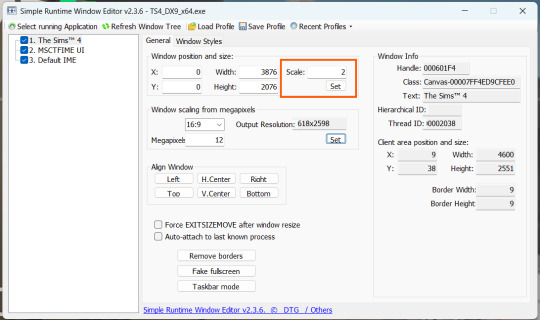
— Manual input: Enter your preferred pixel dimensions. Tap Set.
— Aspect ratio mode: Choose a format (1:1, 16:9, 4:3, etc.) and set your target megapixels. The program will automatically calculate the dimensions. Tap Set.
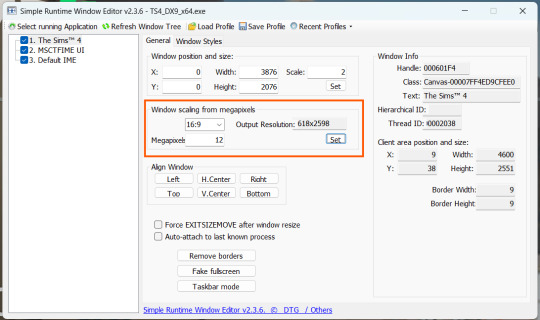
Honestly, you can experiment with any size. During our tests, even a weak PC handled an 8K screenshot without issues – though realistically, 4K is more than enough for most purposes.
Plus, if you're capturing in-game scenes (not just CAS), your screenshots will already be pretty large in file size. You probably won’t want them taking up even more space unnecessarily.
Step 6
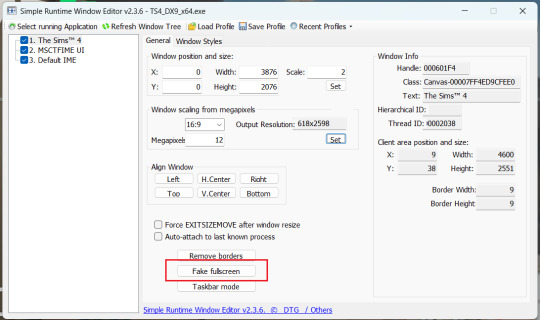
Now when you return to the game, you'll notice the image has become significantly larger and no longer fits your screen resolution – you're only seeing a part of it.
Don't panic! Just wait for your preset to fully load (if you're using one), then take your screenshot as you normally would.
Step 7
Once you've captured your planned screenshot, head back to SRWE and click "Fake Fullscreen" to return to the original resolution.
Now let's compare our results.
Gameplay Scenes

CAS

For in-game screenshots, this method works much better if you have at least a moderately powerful PC. After upscaling, navigation can become tricky due to lag. That said, it's still completely doable since we've prepared our scene in advance.
Post-Processing Screenshots
We've tested several post-processing programs: two paid options and several free ones.
Let's start with the paid options – Topaz Gigapixel AI and Let's Enhance.
Topaz Gigapixel AI
A specialized tool from Topaz Labs designed specifically for AI-powered image upscaling.
It doesn’t include extra features like noise reduction or face correction, but it delivers more precise upscaling, which is especially useful for The Sims 4 screenshots.
Pros:
— Upscale up to 600% (6x) without losing detail.
— Preserves texture clarity (hair, clothing, patterns).
— Automatically restores lost details (e.g., small decor items).
— Supports batch processing (multiple screenshots at once).
Cons:
— $99 price tag.
— Requires a powerful PC for 4K upscaling.
— Limited functionality (just upscaling, no additional edits).
— Trial version doesn’t allow exports.
Example:

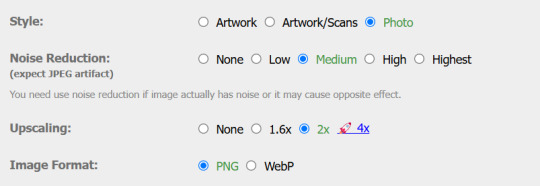
Let's Enhance
A convenient online AI-powered tool for enhancing screenshots. No downloads required – just head to https://letsenhance.io/boost and you're good to go.
Pros:
— Automatic upscaling up to 16K, boosts resolution without losing detail (hair and clothing textures become sharper).
— Dead simple to use: just upload your screenshot, pick a model, and download the result.
— AI doesn't just upscale, it subtly "beautifies" images too (though this is subjective, of course).
Cons:
— Free version limits you to 10 images/month (watermarked downloads; subscription starts at $9/month).
— Internet connection required (no offline mode).
We found these settings work best for Sims screenshots:
Now, let's see the results:

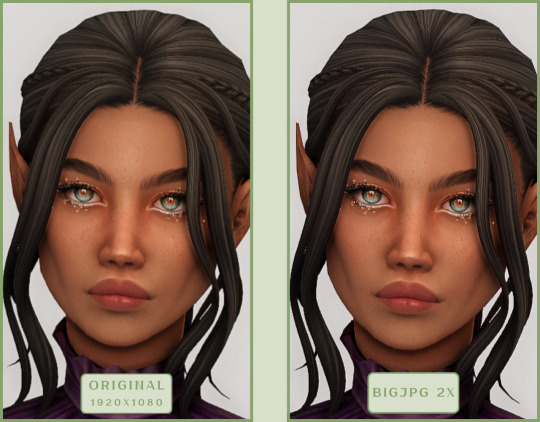
Free Upscaling Tools: Upscayl (with detailed usage guide), Bigjpg, and Waifu2x.
Bigjpg
A handy tool for basic image upscaling tasks, though the free version has limitations on processing speed and number of images.
Pros:
— Solid baseline results: boosts resolution effectively, making images noticeably sharper with genuine quality improvement.
— Free 2x/4x upscaling with watermark-free downloads.
Cons:
— Free version restricts image quantity, size, and processing speed.
— Lacks advanced parameter fine-tuning.
Our recommended settings combo:

The 4x upscale delivers noticeably weaker results.
Sample Bigjpg output:
Waifu2x
A free neural network-based tool. Originally created for upscaling anime images, but works perfectly for The Sims 4 as well.
Pros:
— Upscales images 1.5x–2x without noticeable distortion.
— Preserves art style, doesn't turn pixel art into a "blurry mess" (unlike some other upscalers).
— Available in both online and offline versions.
— Offline version supports batch processing of screenshots.
— Free 2x upscaling with no watermarks.
— No powerful PC required.
Cons:
— Free online version has a 5MB file size limit.
— Maximum 2x scale (no higher options).
— Lacks advanced parameter tuning.
Our recommended settings:
Waifu2x results:

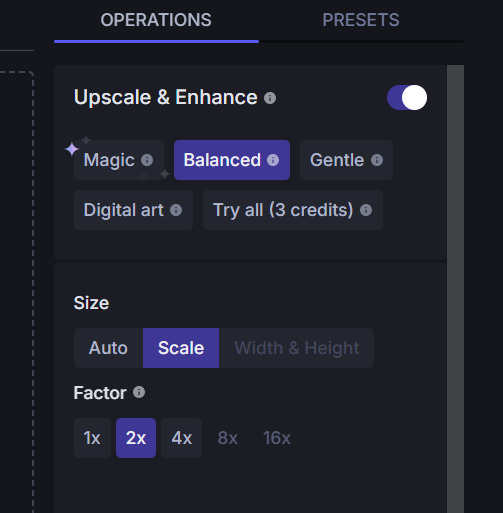
Upscayl
A free, open-source program that uses neural networks to upscale images without quality loss.
Pros:
— Upscales images without distortion.
— Enhances fine details.
— Supports multiple AI models for different screenshot styles.
— Offline version handles batch processing.
— Free 4x upscaling with no watermarks.
— Doesn't require a powerful PC for 2x upscaling.
— Works offline, no internet needed after installation.
Cons:
— Requires a powerful PC for 4x upscaling.
— Minimalist interface – fewer beginner-friendly guides.
— Lacks advanced parameter tuning.
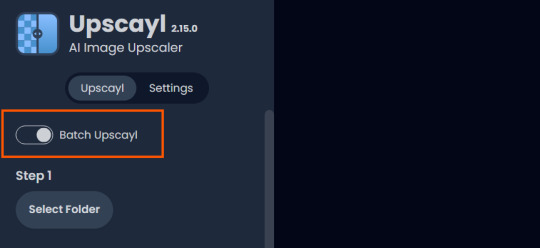
Given Upscayl's minimalist interface and lack of detailed tutorials, we decided to provide a more thorough walkthrough.
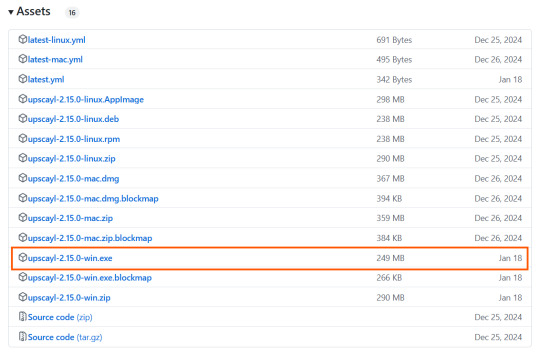
Step 1
First, download the program from its GitHub page. It's completely free and open-source.
Multiple versions are available – choose the one matching your system. For standard Windows, download the file highlighted in the screenshot below.
Step 2
Run the installer as administrator.
Install location doesn't matter – it won't affect performance. Select the destination folder. Click "Install".
Step 3
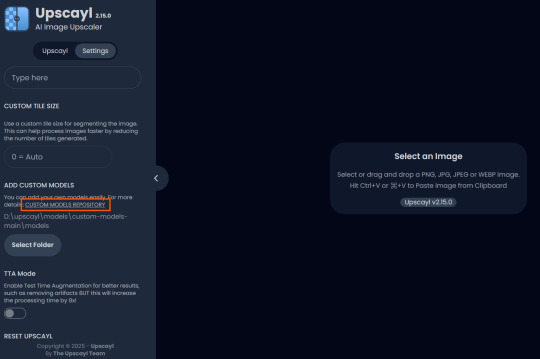
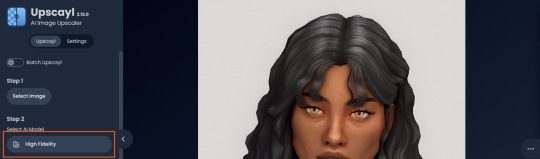
Upscayl includes several built-in AI models (good for testing), but we strongly recommend downloading custom models for better results:
1. Download the custom models pack here (also accessible via Settings → Add Custom Models in-app).
2. Extract the archive.
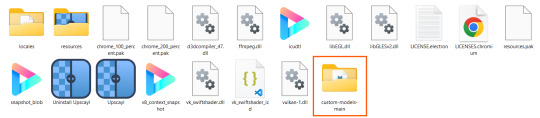
3. Navigate to custom-models-main → custom-models-main.
Move this folder to your Upscayl installation directory (optional: rename it).
Your Upscayl folder should now look like this:
4. Add Custom Models:
— Launch Upscayl.
— Go to Settings and click Select Folder.
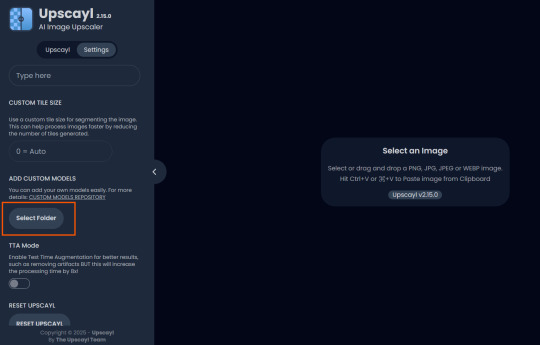
— Navigate to Upscayl → custom-models-main → models
Critical: The folder must be named "models" – don't rename it.
Step 4
Now that you have both the default and custom models loaded, it's time to start enhancing your screenshots.
1. Click Select Image or simply drag and drop your file into the processing area.
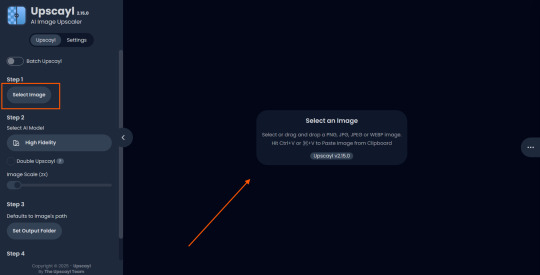
2. Choose Upscale Factor.
While Upscayl supports up to 16x magnification, it warns that anything above 5x may severely strain your system.
For optimal results, stick with 2x to 4x.
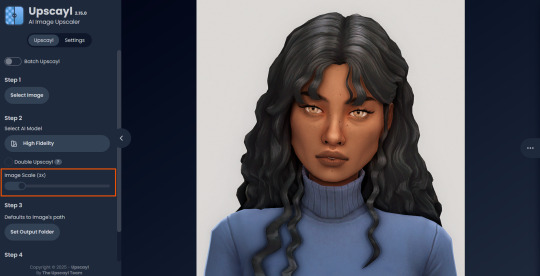
3. Select AI Model.
Click the Select AI Model dropdown: default models show before/after previews, custom models appear as a text list.
4. Experiment! Try different models on the same screenshot. Test various scales (2x, 3x, 4x) – sometimes better results come from modest scaling, while 4x might degrade quality.
For this demo, we'll use the first default model.
5. Click to begin enhancement.
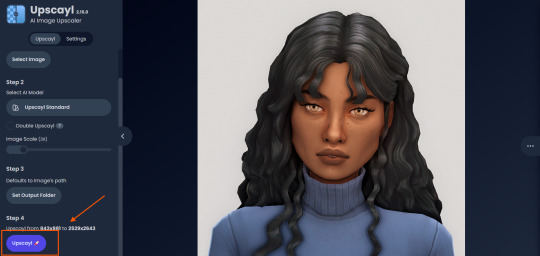
6. Processing time duration depends on original image quality, selected parameters and your PC's power (may complete quickly or take several minutes).
After processing, you'll see a clear side-by-side comparison of the changes.
7. Click the three-dot menu (⋮) for advanced viewing options.
Magnifying lens compares original vs. enhanced versions side-by-side.
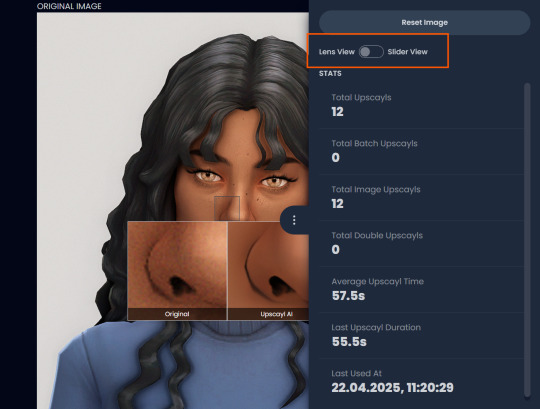
Also you may reset to original and revert all changes instantly.
8. Save your image.
By default, Upscayl saves to the source image's folder. To change this click Set Output Folder.

9. After this, use the Ctrl+S keyboard shortcut, and the new image will be saved. The original filename will be appended with the name of the AI model used and the upscaling scale applied.
You can also use batch processing. Before loading images, you simply need to enable batch loading.
In the settings, there are different format options for saving processed images: PNG, JPG, WEBP. To preserve the best quality, we recommend choosing PNG.
Finally, we're sharing the AI model options we liked best for processing Sims screenshots:
— Remacri (default model)
— Uniscale Restore (custom model)
— Unknown-2.0.1 (custom model)

🌱 Create your family tree with TheSimsTree
❓ Support 🌸 Our Blog
#TheSimsTree#simslegacy#legacychallenge#sims4#sims2#sims3#simsfamily#simstree#sims#sims4legacy#sims4roleplay#sims4stories#sims4couple#thesims4#ts4#ts4cc#plumtreeapp#simsta#simstagram#sims proposal#sims ideas#inzoi
38 notes
·
View notes
Text
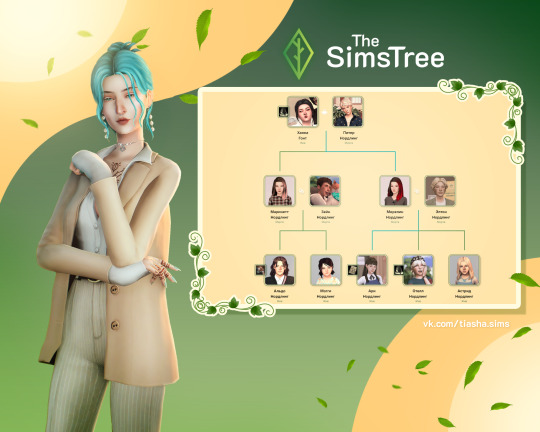
🌳 Creating a Family Tree | TheSimsTree
Keep your family history and precious moments!
ㅤ
If you're a dynasty lover who cares about your sims, you’ve probably been looking for a way to recreate your family tree in digital form.
Today, I am with the team want to share a young project called TheSimsTree, which has been a real lifesaver. We genuinely recommend it based on our own experience 💫 ㅤ
ㅤ
🌿 TheSimsTree.com
This site will become your go-to helper for creating and managing your family tree. It makes it easy to save and visualize the stories of your Sims, share them with other players, and enjoy a ton of unique features and customizations that will make storytelling even more fun.
💌 And if you’ve used PlumTreeApp before, you can import your family tree with just a couple of clicks, so you won’t lose any precious progress.
We’ve shared with links to our family trees ⇣
🐇 Tosy | The story of a little green one sim
🐾 Slooo | A dynasty by chance
🥐 Cladkaya_bulka | The Lauder dynasty
━━✶━━
The main features of the site are available for free, which is great and doesn't feel awkward like when payment is forced on you.
If you genuinely want to support the project and enjoy some premium perks, you can sign up for a subscription. The team has offered a really sweet bonus for our subscribers as a token of appreciation :3
⭐️ The promo code TIASHA gives you a discount of 4$ on an annual subscription!
━━✶━━

Site features:
✍🏻 Creation and management ° A multifunctional family tree that lets you go both up and down. No limits on characters, pets, or generations. ° Displays relationships, allows you to highlight the heir’s line, and even add your partner's family for a complete picture. ° Personality traits can be entered manually, allowing for custom traits. There are also icons for occult affiliations. ° The parent function highlights only the specified parents on the card if the child has different parents. Biological parents won’t be shown in cases of adoption. ° You can keep a personal diary for your sim, adding photos, stories, and details. Uploaded avatars are saved, which helps track the character’s development throughout their life. ° Markers show the completeness of the diary and the avatars of each sim.
🎨 Customization ° A creative space for crafting and designing a unique vibe. ° Lovely wallpapers for every taste, including custom ones from your favorite simmers. ° Dark mode for the interface, along with photo and text editors. ° Options for fonts, colors, tables, lines, highlights, and other elements. ° You can share your social media links in the author’s profile and add a video widget for YouTubers.
💭 Community ° Several privacy settings and the option to share your family tree. ° A public gallery where you can read others' stories and find your audience. ° The ability to like and comment on diaries. ° A blog with articles where you can publish and share your own stories.
━━✶━━
It's clear that the team puts a lot of heart into their work and listens to player feedback, constantly making improvements. It's a wonderful and responsive project that truly deserves support! 💚
43 notes
·
View notes
Note
What editing apps do you use?
I'm assuming this is about making gifs? I'm a Linux and free/open source software enjoyer so my picks are *mildly* unpopular lol
Shotcut - video editor, all my gifs are edited as mp4s, has similar functionality as something like photoshop for layers, blending, sharpening, color grading etc
GIMP - image editor for making any overlays, text, vignettes
Ezgif - gif tools website, highly customizable video to gif converter especially to get under 10mb, Shotcut will let you export videos to gif but has limited options so the quality isn't great
2 notes
·
View notes
Text
Why Wix websites are an ideal way to get started online with a platform that will grow with you and offers a great framework to build your knowledge. What is Wix? Wix is a cloud-based web development platform that enables users to create, design, and publish custom websites without the need for coding skills. It was founded in 2006 by Avishai Abrahami, Nadav Abrahami, and Giora Kaplan. Wix is headquartered in Tel Aviv and is publicly traded on the NASDAQ. The company's CEO is Avishai Abrahami. Pros of using Wix include ease of use, customisable templates, a wide range of features and integrations, and affordability. Cons include limited design flexibility, limited functionality compared to other website builders, and limitations on the number of features available in the free version. Wix is a solid free website builder that’s perfect for anyone looking to create a professional-looking website. Wix has over 200 million users, making it one of the most popular website builders out there. What is Wix.com used for? It is a user-friendly platform that allows users to create a wide range of websites, including personal portfolios, online stores, business websites, and more. With Wix, users can choose from a selection of customizable templates, add various features such as forms, social media integrations, and blogs, and publish their website with just a few clicks. Here are some scenarios where Wix excels: Small to Medium-sized Websites: Wix is ideal for small to medium-sized websites that require a basic or intermediate level of functionality and design. Easy Website Building: Wix's drag-and-drop editor and wide range of templates make it easy for users with little to no technical expertise to build and launch a website. Ease of Use: Wix is known for its ease of use and user-friendly interface, making it a great choice for beginners and non-technical users. Budget-Friendly: Wix offers a range of pricing plans, including a free plan and premium plans at affordable prices, making it a budget-friendly option for many users. Wide Range of Features: Wix offers a wide range of features, including e-commerce, blogs, forms, and more, making it a comprehensive solution for many types of websites. Mobile Responsiveness: Wix's templates and designs are optimised for mobile devices, ensuring that your website will look great and be easily accessible on all devices. Fast and Reliable Hosting: Wix provides fast and reliable hosting for all websites built on its platform, ensuring that your website will be accessible to users at all times. These are some of the scenarios where Wix excels. Whether you're a small business owner, freelancer, or hobbyist, Wix offers a user-friendly platform and a wide range of features to help you build a professional and functional website. Building a website with Wix Here are the steps to build a functioning 5-page website on Wix.com: Sign up for a Wix account: Go to Wix.com and sign up for a free account. Choose a template: Select a template that best fits the type of website you want to create. You can choose from a wide range of templates in different categories, including business, personal, portfolios, and more. Customize your template: Use the Wix Editor to customize your template by adding text, images, videos, and other elements to your pages. You can also change the layout, colours, fonts, and other design elements. Add pages: To add pages to your website, click the "Add Page" button in the Wix Editor and select the type of page you want to create. You can add up to 500 pages to your Wix website. Add features: Wix offers a wide range of features that you can add to your website, including contact forms, blogs, online stores, and more. To add a feature, go to the Wix App Market and select the feature you want to add. Publish your website: Once you have finished designing and customizing your website, click the "Publish" button to make your website live and accessible to the public.
Optimize your website for search engines: Wix offers built-in SEO tools, but it's important to optimize your website further to improve its visibility in search engine results. This includes adding page titles and meta descriptions, optimizing images, and adding relevant keywords to your content. These are the general steps to build a 5-page website on Wix.com. Depending on the complexity of your website and the features you want to add, the process may take a longer or shorter time. However, Wix provides a user-friendly platform and a wide range of resources to help you build and publish your website with ease. Add comment forms to Wix By default, commenting on a Wix blog requires visitors to log in using a Wix account, Facebook, or Google. However, if the website owner has enabled the option for visitors to comment without logging in, then visitors can simply enter their name and email address and submit their comments. If you're a website owner using Wix and would like to allow visitors to comment on your blog without logging in, you can do so by going to the Blog Manager in your Wix Editor and selecting the "Settings" tab. From there, you can turn on the option for "Allow comments without logging in." It's important to note that allowing visitors to comment without logging in may increase the risk of spam comments and could potentially harm your website's reputation. As a website owner, it's recommended to regularly monitor and moderate your blog comments to ensure the content is appropriate and relevant. Creating Wix.com member sites To create a login page in Wix, you can use the Wix Members App, which is a built-in app for creating membership websites with protected pages and user accounts. Here are the steps to create a login page: Add the Wix Members App to your website: Go to the Wix App Market, search for the Wix Members App, and click "Add to Site." Set up your membership options: In the Wix Members App, configure your membership options such as sign-up and login settings, protected pages, and user roles. Create a login page: In the Wix Editor, add a new page to your website and select the "Login" page type. Customize your login page: In the Wix Members App, you can customise the design and content of your login page, including the page layout, text, colours, and images. Publish your login page: Once you have customized your login page, publish your website to make it live and accessible to visitors. It's important to note that the exact steps may vary depending on the version of Wix you are using. If you encounter any difficulties, you can refer to Wix's support resources or reach out to their customer support for assistance. Wix.com and SEO Wix has made improvements to its SEO capabilities in recent years, but it still has limitations compared to other website builders and traditional website development. Some of the pros of Wix for SEO include a clean and organized HTML code, built-in SEO tools, and the ability to customize page titles and meta descriptions. However, there are also some cons to using Wix for SEO, such as limited control over URL structure, limited ability to optimize content for specific keywords, and limited options for creating and optimizing landing pages. Additionally, Wix websites can sometimes load slower than those built with other platforms, which can negatively impact SEO. In conclusion, while Wix can be a good choice for basic SEO optimization, more advanced SEO efforts may require a more robust platform or custom website development. It's always a good idea to consult with an SEO expert to determine the best approach for your specific needs. What is Wix.com Premium Plan? Wix.com offers several premium plans that provide additional features and benefits compared to the free plan. The Wix premium plans include: Combo Plan: This plan includes more storage and bandwidth, as well as a free domain name for one year. Unlimited Plan: This plan provides unlimited storage and bandwidth, as well as a free domain name for one year and access to premium support.
Pro Plan: This plan is designed for professionals and small businesses and includes features such as custom logos, social media integrations, and the ability to sell products online. VIP Plan: This plan provides priority support, advanced site statistics, and access to Wix's exclusive VIP services. Each of these premium plans includes various levels of e-commerce functionality, website analytics, and the ability to remove Wix branding from your site. The exact features and benefits offered by each premium plan vary, so it's important to carefully review the features and pricing of each plan to determine which one is best for your needs. What scenarios are there where Wix would be no good? Wix is a popular website builder that offers a simple and user-friendly platform for building and hosting websites. However, there are certain scenarios where Wix may no longer be appropriate for a project: Complex or Custom Websites: If you require a complex website with custom features and functionalities that are not available through Wix's platform, you may need to consider alternative solutions. Large-Scale Enterprise Websites: Wix may not be suitable for large-scale enterprise websites that require a high level of security, performance, and scalability. Advanced Customization: If you need advanced customization options and full control over the HTML, CSS, and JavaScript code of your website, Wix's platform may not be able to meet your needs. E-commerce: While Wix offers an e-commerce solution, it may not be suitable for large-scale online stores with complex requirements and a high volume of transactions. Mobile App Development: If you need to develop a mobile app, Wix may not be the right solution as it is primarily focused on website building. These are some of the scenarios where Wix may no longer be appropriate for a project. However, Wix offers a wide range of features and integrations to meet the needs of most small- to medium-sized websites and businesses. What other companies does Wix.com own? Wix has acquired several companies and technologies over the years to enhance its platform and offerings. Some of the notable acquisitions by Wix include: DeviantArt: Wix acquired the popular online art community, DeviantArt, in 2017. OpenRest: Wix acquired OpenRest, a cloud-based restaurant ordering and delivery platform, in 2014. Flok: Wix acquired Flok, a customer engagement and loyalty platform, in 2017. These acquisitions demonstrate Wix's commitment to providing a comprehensive platform for website building and digital marketing. This article was first published on AIO Spark: Can't code? Wix will help you build a great website in 2023
4 notes
·
View notes
Text
Since this post isn't super specific in terms of facts I'm gonna be just adding some off the top of my head! (More at OP's link, this is just for the 'first glance pls' crowd)
Dreamwidth is predominantly text. Your feed will not be as visual as on Tumblr. -> You can embed videos from e.g. YouTube, and you can post your own images/video, but Dreamwidth itself cannot host the images/video (like Tumblr can), so you will need to host them somewhere else, like imgur, and upload via link in the New Post editor.
Dreamwidth's New Post editor is very similar to Tumblr's. You can work in Rich Text (click buttons to do all the formatting), or HTML (code all formatting manually).
Your feed is similar to Tumblr's. You see the posts from the people and communities you follow, most recent first, and only those. -> When reading, you can filter your feed (Reading page) and see only posts from people, or only posts from Communities.
No reblogging. Everything you post on your blog stays on your blog. It will be seen by fewer people -- this is a pro and a con. It will never spread wildly out of your control, and nobody can add anything to your posts.
Multiple levels of privacy. You can set your entries viewable to everyone, just friends, or just you, on an entry-by-entry basis. It can be changed after posting. Within "just friends", you can create more defined filters, and e.g. show an entry only to your Severance fan friends and not to your 911 fan friends. Or whatever.
There are comment sections under each post! You can delete comments on your entries. (You can also write very long comments. Up to 16k characters.)
You can make VERY LONG posts. The limit is 300k characters. You can easily host fanfics or long fic chapters as journal entries (and a lot of people do and always have done!). -> Long posts can go under a Read More (Tumblr inherited this function from LJ and DW.)
Communities function like shared journals with mods, where all community members can make posts, and comment on each other's posts. You follow Communities the same way you follow people.
You can find communities by searching Dreamwidth for an interest (eg "crocheting") and filtering the results to Communities only.
Managing your friends: You can let someone read your entries (Grant access), or follow their blog (Subscribe), or both, depending on what suits you.
YOUR USERNAME IS FOREVER. Basically. If you want to change it, you need a token that costs money. (It's one of the few ways they get any money in, since using the site is free.) Choose carefully! :'D
So it seems like some of you might be interested in learning more about Dreamwidth.
Listen, here's the thing: Dreamwidth is not slick. It is not fancy. Its base code was originally put together some two decades ago or more, and it looks like it. It can't do much with images and definitely not with video—like, I think there's some way to embed video, but I have no idea how to do it, and hosting it on Dreamwidth is, uh...
The point is! Dreamwidth is a lot different from Tumblr. It's closer to Tumblr than it is to Facebook or Instagram, but it's a lot more old-school internet than Tumblr is. And that means that, for anyone who wasn't on the internet some ten, fifteen years ago, there's probably going to be a steep learning curve. It can take more effort to post things there, and more effort to find your people, its image hosting capacity can charitably be described as both "limited" and "poorly organized", and overall it may still never be the kind of website where you, personally, will want to spend a lot of time or do a lot of things. Dreamwidth does not and will never have an app, for pretty much the same reasons as AO3.
But there is one thing I can guarantee, and that is that Dreamwidth is willing to fight for us and our rights. They're already doing so.
#there is so much more but i feel like these are the things i get asked about most#dreamwidth#tumblr alternatives#honestly it isn't going to fill the same niche that tumblr is filling! not exactly! but it can still be a lot of fun if it suits you!
7K notes
·
View notes
Text
Maximizing Productivity with the Logitech M500s: A Deep Dive into Customizable Shortcuts

In the modern workspace—whether at home, in the office, or on the go—productivity hinges not just on the speed of your internet or the power of your computer, but also on the efficiency of your tools. One such unsung hero in the productivity ecosystem is your computer mouse. And few mice are as robustly built for task efficiency as the Logitech M500s.
This corded mouse may seem simple on the outside, but beneath its sleek exterior lies a powerhouse of customizable features that can significantly improve your daily workflow. In this post, we’ll explore how the Logitech M500s can be used to supercharge your productivity, especially through its highly customizable buttons and ergonomic design.
Why Shortcuts Matter for Efficiency
Before we dive into the Logitech M500s itself, it’s important to understand why customizable shortcuts are critical:
Time-Saving: One-click shortcuts replace multi-key commands or menu navigation.
Improved Focus: Custom commands let you stay immersed in your work without shifting between keyboard and mouse constantly.
Accessibility: For users with repetitive stress injuries or physical limitations, mouse shortcuts offer alternative input methods.
The Logitech M500s takes this to heart with seven programmable buttons that can be tailored to your specific needs.
Overview: Logitech M500s Key Features
Let’s look at what makes this mouse ideal for productivity enthusiasts:
High-Precision Sensor: 400 to 4000 DPI range
Dual-Mode Scroll Wheel: Toggle between click-to-click and hyper-fast scrolling
7 Programmable Buttons: Via Logitech Options software
Ergonomic Contour: Full-sized shape with rubber grips for extended use
Wired USB Connection: No lags, no batteries, no interruptions
Now let’s break down how each of these features plays into real-world productivity gains.
1. Customizing Shortcuts with Logitech Options
The real power of the Logitech M500s is unlocked when you download and use Logitech Options software. This free tool allows users to:
Assign custom commands to any of the 7 buttons
Create application-specific profiles
Adjust pointer speed and DPI sensitivity
Enable gesture-based functions (via button clicks)
Examples of Popular Shortcuts to Assign:
Browser Navigation: Assign back/forward buttons to web page navigation
Copy & Paste: Map Ctrl+C and Ctrl+V to thumb buttons
Multimedia Controls: Control volume, play/pause from your mouse
Virtual Desktops: Switch between desktops or apps instantly
Zoom In/Out: Great for designers or editors
💡 Pro Tip: Set different profiles for different software—Excel, Photoshop, Chrome—so your buttons change functions automatically based on what you’re using.
2. Use Cases: Productivity in Different Professions
A. Office Professionals
For those juggling spreadsheets, emails, and video calls, the Logitech M500s is perfect for:
Scrolling long Excel sheets with hyper-fast scrolling
One-click shortcuts to “Reply All” in Outlook
Using gesture functions to switch between tasks
B. Graphic Designers
Graphic artists and editors often use software like Adobe Photoshop or Illustrator where precision and shortcuts are critical:
Zoom and brush size mapped to side buttons
Panning tools triggered via custom buttons
Toggle grid/view modes in one click
C. Developers
Coders who spend all day typing can use the mouse to offload repetitive commands:
Compile or run script buttons
Toggle terminal vs. code view
Navigate through tab-heavy IDEs like VS Code or IntelliJ
D. Video Editors
With video software like Adobe Premiere or DaVinci Resolve:
Timeline zoom via DPI adjustment
Cut/split/trim mapped to side buttons
Scroll through frames effortlessly with the fast scroll wheel
3. Speed and Precision: Custom DPI Settings
The Logitech M500s offers on-the-fly DPI switching. This is critical for those who switch between:
High-speed navigation: Like browsing multiple web pages or dragging large files
Precision mode: Like selecting anchor points in Illustrator or trimming in video editors
You can assign two DPI settings (e.g., 800 and 3200) and toggle between them with a click. This is especially useful for multi-monitor setups where pointer travel is a factor.
4. Scroll Like a Pro: Hyper-Fast Scrolling in Action
Unlike traditional wheels, the M500s comes with dual scroll modes:
Click-to-Click: For controlled scrolling, like reviewing text
Free-Spin Mode: For blazing through long documents or web pages
For example:
Scroll through a 500-line spreadsheet in seconds
Read long PDFs without finger strain
Navigate complex codebases quickly
5. Wired Connectivity = Reliability
In an era where wireless devices are common, why stick with a corded mouse?
No battery interruptions
Zero latency
Consistent connection
If you work in a setup where stability is key—like editing large files or working on cloud-based platforms—a wired device like the Logitech M500s ensures uninterrupted performance.
6. Ergonomic Design: Work Longer Without Fatigue
Comfort isn’t just a luxury—it’s essential for productivity. The Logitech M500s has:
A full-size shape to support your palm
Soft rubber grips for better control
Contoured design to reduce wrist strain
Users who spend 6+ hours at the desk report significantly reduced fatigue compared to smaller or less supportive mice.
7. Cross-Platform Compatibility
The M500s is compatible with:
Windows 10 and above
macOS
Chrome OS
Linux (basic functionality)
You can use the mouse across desktops, laptops, and even Chromebooks without needing additional drivers.
8. Tips for Getting the Most Out of the Logitech M500s
Download Logitech Options: Don’t skip this—customization is the key.
Experiment with DPI: Try different settings for creative vs. navigation tasks.
Try Different Profiles: Switch between app-specific button profiles.
Map Macros: For tasks like renaming files or filling forms.
Use Scroll Toggle Often: Switch to fast-scroll for long pages—it’s a game-changer.
Comparison Chart: Logitech M500s vs. Generic Mouse
FeatureLogitech M500sGeneric Wired MouseProgrammable Buttons72 or NoneDPI Range400–4000800–1200Scroll ModesDual-modeSingle-modeCustom ProfilesYesNoErgonomic GripContouredStandardPriceAffordableVaries
Final Thoughts
The Logitech M500s is more than just a mouse. It’s a productivity companion that molds itself to your workflow. Whether you’re processing data, editing content, or managing dozens of browser tabs, this corded powerhouse provides speed, precision, and comfort—all at a price point that won’t break the bank.
By leveraging its programmable buttons, dual-mode scrolling, and custom DPI settings, you can turn hours of repetitive tasks into minutes—leaving you with more time and less stress.
FAQs: Maximizing Productivity with Logitech M500s
Q1: How do I assign functions to buttons on the Logitech M500s?
You can download Logitech Options software from Logitech’s website, which allows you to assign custom functions, shortcuts, or app-specific commands to any of the 7 buttons.
Q2: Can I use the Logitech M500s on macOS or Linux?
Yes. The mouse is fully compatible with macOS and Linux. While Logitech Options is not supported on Linux, the hardware functions like DPI and basic button inputs still work.
Q3: What kind of tasks benefit the most from shortcut customization?
Tasks like coding, data entry, graphic design, email management, and video editing can greatly benefit from shortcut customization. Assign common actions like copy/paste, undo, or application switching.
Q4: Is the M500s good for gaming?
While not a dedicated gaming mouse, its 4000 DPI sensor and zero-latency wired connection make it capable of handling most casual and even competitive gaming scenarios.
Q5: Can I use the same shortcuts across different apps?
Yes, or you can customize buttons uniquely for each app using Logitech Options. For instance, the side button might act as "Undo" in Photoshop but "Back" in Chrome.
0 notes
Text
SocialEngine vs Major Social Networking Scripts | Features Comparison

In the digital age, social network scripts are essential tools for creating modern, scalable, and customizable online communities. Choosing the right platform is critical for businesses and entrepreneurs aiming to build high-functioning social networks. This blog compares top social networking scripts - SocialEngine, Wowonder, Sngine, PhpFox, Moosocial, and Mighty Networks - highlighting their features and limitations. Among these, SocialEngine emerges as a top-tier platform due to its extensive flexibility, user-friendly customization, and robust administrative tools. The comparison covers key features including layout editing, branding options, user permissions, media sharing, plugin availability, and monetization tools. SocialEngine offers a drag-and-drop layout editor, allowing non-developers to build and customize pages effortlessly - a feature absent in all the competing platforms. It also provides advanced white-labeling, letting users fully customize branding and domain settings without altering core files. Another standout feature is granular member level permissions, which allow precise control over what different user types can access or do - critical for managing diverse community roles. It supports a short video/reels module via third-party plugins, mimicking popular formats like TikTok, and provides direct WhatsApp and email support, a convenience not offered by other platforms in the list. Unlike some competitors, SocialEngine includes a cloud-hosted SaaS option, ensuring hassle-free updates, backups, and maintenance. Its plugin marketplace and built-in monetization tools (subscriptions, ads, virtual currency) add further value, supporting both community engagement and revenue generation. The blog concludes by positioning SocialEngine as ideal for professional networking sites, community builders, and brands seeking a scalable, secure, and fully customizable solution. With features that prioritize user experience, admin control, and long-term growth, SocialEngine empowers users to launch social networks tailored to their unique goals. Whether you're starting a niche community or a large-scale social platform, SocialEngine offers the power and versatility needed to succeed - all without heavy technical requirements.
For more details, kindly visit:- SocialEngine vs Major Social Networking Scripts | Features Comparison
Mail us at [email protected] to schedule a quote and become the owner of your SocialEngine Website.
#social networking scripts#socialengine features#professional networking sites#social network scripts
0 notes
Link
0 notes
Text
Actually heck it I have to add some resources here that aren't just in the tags LMAO
1.
Free 7 day trial! And pretty cheap paid version as well.
Lots and LOTS of videos and practice for many different coding types!
2.
When I'm having troubles figuring out a function (or I forgot how basic stuff works LMAO), this is my go-to.
Expert documentation on so many details of so many coding languages, and examples as well!
3.
When it comes to more specific problems, I usually look here. They've got allll kinds of things here, and very good explanations!
4.
Where I go for so many questions LMAO
Remember, if you have a coding question, someone else has already had that same question and gotten an answer on StackOverflow somewhere XD
5.
This is THE Coding IDE we use in my classes. It's free. It's good. It works with Github and has a billion plugins for different coding languages and other neat things.
6.
Speaking of github
Here is THE code sharing website!
9.
This place has really good docs as well
10.
Another coding learning website!
Even beyond all of this: just going to Youtube and looking up something like "javascript tutorial for beginners" brings up a billion videos that you can watch. There are SO many resources out there!! You can just learn! Right now!
There are a lot of very good resources and tutorials for making video games as well! Many engines don't require too too much coding knowledge, and you can absolutely start messing around with things without having any background in it!
Some more resources for game dev (that I got from PirateSoftware's discord server LMAO):
Read this if you've ever wanted to make a game. Hugely inspirational
A database of video game engines!
it would appear I hit the link limit but there are so many resources out there!!
For video games, I have to mention there being a ton of resources for visual novels in particular
If anyone else wants to add more coding resources I would love that 👀
There's always more to learn, after all XD
please learn how to code
like, if you're bored today, and not doing anything,
learn a little bit of coding please
#sorry if some of this isn't worded the best I got sleepy but still wanted to finish it LMAO#also sorry I have no idea how tumblr formatting works I am but a mobile user LMAO
34K notes
·
View notes
Text
Best Free Video Editing Software for Beginners in 2025

In today’s digital-first world, video content is king—and whether you're creating content for YouTube, Instagram Reels, or TikTok, having the right editing tools can make or break your brand. But if you're just getting started, the idea of shelling out hundreds of dollars on software might be intimidating.
Luckily, 2025 has ushered in a new generation of free video editing software that’s perfect for beginners. In this guide, we’ll explore the top tools you can use to start editing high-quality videos—no expensive subscriptions, no steep learning curves.
And if you ever feel overwhelmed or want professional polish on your videos, check out our video editing services at Branding Hosts for affordable, agency-level support.
1. CapCut (Desktop & Mobile)
Best for: Short-form content creators
CapCut is a top-tier free video editor from the makers of TikTok, and it's become incredibly popular among social media creators. Its intuitive timeline, built-in effects, music library, and auto-captioning tools make it ideal for short-form video creation.
Pros:
No watermark
Built-in templates and transitions
Mobile and desktop versions available
Cons:
Not ideal for long-form or cinematic editing
Beginner Tip: Use CapCut’s auto-subtitle feature to quickly add captions to your Instagram Reels or TikTok videos.
2. DaVinci Resolve
Best for: Beginners who want to grow into pros
DaVinci Resolve by Blackmagic Design is a Hollywood-grade video editor that’s completely free. While the interface might seem overwhelming at first, the reward is huge—this software supports color correction, motion graphics, and audio editing all in one place.
Pros:
Powerful all-in-one suite
Used by professional editors
High-quality output
Cons:
Steeper learning curve
Demands a powerful computer
Beginner Tip: Start with the "Cut" page in DaVinci—it’s designed for faster, simpler editing.
3. Clipchamp
Best for: Windows users and brand marketers
Clipchamp is Microsoft’s answer to easy video editing. It offers drag-and-drop functionality, branding tools, and cloud storage integration—all in a clean browser-based interface.
Pros:
Built-in templates and stock media
Cloud sync for autosaving
Direct export to YouTube or OneDrive
Cons:
Free plan includes limited stock assets
Not ideal for cinematic or long-format videos
Beginner Tip: Use Clipchamp’s “Brand Kit” feature to keep your logo, fonts, and colors consistent.
4. VN Video Editor
Best for: Mobile-first editors
VN (VlogNow) is a mobile-first editing app that’s surprisingly powerful. With features like keyframe animation, green screen support, and text overlays, VN bridges the gap between mobile ease and professional features.
Pros:
Easy to use interface
Professional-level features
No watermark on export
Cons:
Limited desktop support
UI may feel cramped on smaller screens
Beginner Tip: Use VN’s music sync feature to automatically match video transitions with your audio beat.
Too Much to Learn? Let Us Help.
Free software is a fantastic starting point—but let’s face it, professional-looking edits take time, creativity, and a sharp eye. If you're looking to elevate your content without spending countless hours learning software, our team is here for you.
👉 Hire Branding Hosts for expert video editing and focus on growing your brand while we handle the visuals.
Final Thoughts
Whether you're creating YouTube tutorials, TikTok skits, or Instagram promos, the best free video editing software is the one that helps you get started now. Each of the tools listed above brings something unique to the table, so try a few and stick with the one that feels right.
And when you're ready to take your content to the next level, don’t hesitate to reach out to our video editing experts at Branding Hosts.
Your audience deserves quality content—let’s make it happen.
0 notes
Text
eClass Nulled Script 6.2

Unlock Premium Learning with eClass Nulled Script – 100% Free Download eClass Nulled Script is the ultimate solution for educators, course creators, and entrepreneurs who want to build a professional and scalable learning management system (LMS) without spending a fortune. Designed to rival premium platforms, this powerful script brings high-end e-learning features to your fingertips — absolutely free. Whether you're launching an online school or selling digital courses, eClass Nulled Script has everything you need to succeed. What Is eClass Nulled Script? The eClass Nulled Script is a robust, self-hosted learning management system that mimics the features of popular LMS platforms. It’s a nulled version of the premium eClass LMS script, offering complete functionality without any licensing restrictions. With this version, users can access premium tools, modules, and templates for zero cost — enabling fast deployment of online academies, training centers, and course portals. Technical Specifications Script Type: PHP Laravel-based LMS License: Nulled – No activation required Backend Framework: Laravel 8+ Frontend Framework: Bootstrap 5 Database: MySQL/MariaDB Mobile Friendly: 100% Responsive UI Features and Benefits Multi-Instructor System: Collaborate with multiple course creators in a seamless environment. Advanced Course Builder: Add videos, quizzes, PDFs, and more using the intuitive drag-and-drop editor. Live Classes Integration: Integrate Zoom and BigBlueButton for live, interactive sessions. Payment Gateways: Supports PayPal, Stripe, Razorpay, and more. SEO Ready: Optimize your content easily for search engines. Certificate Generator: Offer personalized completion certificates to students. Why Choose eClass Nulled Script? What sets the Nulled Script apart is its unmatched flexibility and zero-cost entry. It allows educators to monetize their expertise without paying for expensive SaaS platforms or dealing with monthly fees. You gain complete control over your platform, branding, and data — all while enjoying features usually locked behind paywalls. Real-World Use Cases Coaching Centers: Build a professional portal for tutoring, competitive exam preparation, or skill training. Corporate Training: Train employees or partners with custom, interactive courses. Freelance Educators: Launch your own branded academy to sell niche courses to a global audience. Institutions & Universities: Create a scalable learning system for students and faculty members. How to Install eClass Nulled Script Download the full package of eClass from our website. Unzip the files and upload them to your web server via FTP or cPanel. Create a MySQL database and assign the correct user privileges. Run the installation wizard by navigating to your site’s root domain. Follow the step-by-step setup process, add your admin credentials, and launch your LMS. With a few simple steps, you’ll be ready to publish courses, onboard instructors, and enroll learners instantly. Frequently Asked Questions (FAQs) Is the eClass Nulled Script safe to use? Yes, the version we provide is clean, tested, and free from malicious code. Always download from trusted sources to ensure your site’s security. Can I upgrade to the original licensed version later? Absolutely. If you choose to scale your operations, you can later opt for the licensed version while retaining your course data. Is technical knowledge required to use eClass Nulled Script? Not much! While basic hosting knowledge is helpful, the script is built with an easy-to-use installer that guides you through the process. Are there any hidden charges? No, the script is 100% free with no hidden costs. You’re free to use it without any limitations. Download eClass Nulled Script Today Start your journey into the world of digital education with confidence. The eClass empowers you to launch an elite online learning platform without investing in costly licenses or monthly plans. Download now and take control of your eLearning business today.
Looking for more nulled plugins to power your website? Explore our full collection to supercharge your digital toolkit. Need a top-tier WordPress theme for your LMS site? Check out Impreza NULLED — a flexible and beautifully designed theme that pairs perfectly with your new LMS.
0 notes
Text
WP AI Engine Review – Convert Your WordPress Site into a 3-in-1 Marketing Machine
Welcome to my WP AI Engine Review. If you’ve been struggling to manage your WordPress site, build funnels, send emails, or create high-quality SEO content consistently? Imagine having an all-in-one solution that simplifies everything into a single dashboard powered by cutting-edge AI.
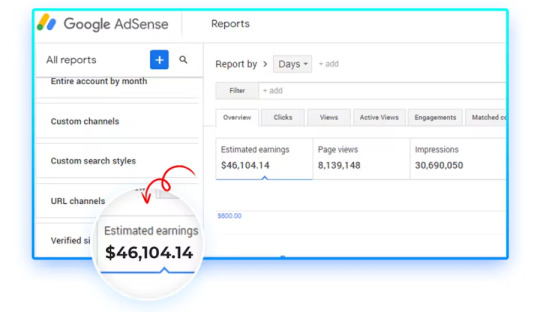
Enter WP AI Engine, the world’s first all-in-one AI-powered marketing platform that claims to help you send unlimited emails, generate 100,000 SEO-optimized blogs, and build 50,000+ ultra-fast, high-converting funnels, sales pages, and checkout pages in just 3 easy clicks.
In this in-depth WP AI Engine review, we’ll cover exactly what this app does, its core features, how it works, pros and cons, pricing, use cases, and whether it’s the right solution for marketers, bloggers, and entrepreneurs looking to automate and dominate online.
What Is WP AI Engine?
WP AI Engine is a cutting-edge WordPress AI automation app designed to streamline and automate various digital marketing tasks such as email marketing, content creation, funnel building, and website management. It enables users to send unlimited emails to unlimited subscribers, generate up to 100,000 SEO-optimized blog posts, and build over 50,000 ultra-fast sales funnels, landing pages, and checkout pages, all from a single dashboard.
WP AI Engine Review: Overview of Product
Product Creator: Amit Gaikwad & Anirudh Baavra
Product: WP AI Engine
Launch Date: 2025-Apr-28
Launch Time: 11:00 EDT
Front-End Price: $19 One-Time Payment! (Limited-Time Access)
Official Site: Click Here To Visit Official Salespage
Product Type: Tools and Software
Support: Effective and Friendly Response
Recommended: Highly Recommended
Bonuses: YES, Huge Bonuses
Skill Level Required: All Levels
Discount Coupon: Use Code “ENGINE30OFF” for 30% Off Full Funnel
Refund: YES, 30 Days Money-Back Guarantee
WP AI Engine Review: About Authors

WP AI Engine was created by Amit Gaikwad and Anirudh Baavra, who bring vast knowledge and skills to the forefront. Amit is known for his extensive knowledge of affiliate marketing, software and ability to create complex automation systems. Amit Gaikwad, on the other hand, is an experienced entrepreneur and software developer known for his ability to devise new solutions that simplify complex operations.
Amit and Anirudh collaborate on vital solutions for marketers looking to simplify their affiliate marketing efforts, such as BizMails, Grok Blaster, AI App Builder, AI Podcast Empire, DFY AI Sites, AI Video News Maker, WP AI Hub, Whitelabel AI, Omni AIs, Domain Blaster, DIY Niche Sites, DealSites, SoftSites, WP Funnels, Auto Health Sites, WP Emails, Azon AutoSites, WebWise, WP Host, and many others.
WP AI Engine Review: Key Features of WP AI Engine
First-Ever WordPress-Based 3 In 1 AI Tech That Creates Self-Updating Blogs, High-Converting Funnels, And Send Unlimited Emails From One Dashboard
Converts Your WordPress Into Fully Functional FREE Autoresponder, Sales Funnel & Blog Creator In 3 EASY Steps
Save 3X MORE Time & Money- Stop Juggling With Multiple Tools When These Advanced AI Tech Does All By Itself
Auto-Create 1,00,000+ DFY Google Friendly Blogs In Red Hot Niches Without Writing A Single Word Yourself
Send Inbox Friendly Emails To Your Subscribers With Built-in WP Servers & Guaranteed 99.4% Inbox Delivery Rate
Create 50,000+ Profit Making Funnels With Landing Pages, Upsells, Checkout, And Thank-You Pages
Customize Anything With A Lightning-Fast, Drag-n-Drop Editor—Change Text, Images, Layouts In Seconds
Built-In Email Sender With 99% Inbox Rate—No More Paying For External Services Like GetResponse, Mailchimp Or Aweber
Profit Instantly By Using These Blogs for ClickBank, AdSense Or By Promoting Other Affiliate Offers
Get Premium AdSense Booster To Rotate Ads On Your Blogs & Get Maximum CTR
Global Payment Gateway Support To Sell Products Or Services Worldwide With Ease
WooCommerce Ready + Integration With Major Tools & Platforms So Everything Connects Smoothly
Never Worry About Paying Huge Money Monthly To Expensive Third Party Platforms
No Monthly Payment- Get All Benefits For A Low, One Time Price
100% Easy To Use, Newbie Friendly Technology That’s Never Seen Before
30-Day Money Back Guarantee Included

WP AI Engine Review: How Does It Work?
Now, It’s Time To Turn Your Worries Into Blessings In Just 3 EASY Steps (And There’s NO Huge Investment Or Time Needed)
Step #1: Login
To get started, log in to this amazing technology before the price goes up beyond your imagination.
Step #2: Create
Now, go ahead & let WP AI Engine create your first profit making sales funnel, attention grabbing blog or even send emails with no third party dependency. Crazy part, you don’t need to be a techie, write a single word yourself or hire expensive freelancers.
Step #3: Publish & Profit
BOOM, you’re all done now. Let WP AI Engine remove the grind & complete everything with literally very less work at your end. (BONUS- Use limited time commercial license to offer these mind blowing services to hungry audience & charge again & again)
WP AI Engine Review: Who Should Use It?
Affiliate Marketers
Email Marketers
Bloggers & Niche Site Owners
Product Creators
Course Creator & Courses
Digital Agency Owners
Freelancers
YouTube & Content Creator
Ecom Sellers
Social Media Marketer
Side Huslers & Part-Time Earners
Works For Anyone
WP AI Engine Review: OTO’s And Pricing
Add My Bundle Coupon Code “ENGINE30OFF″ – For 30% Off Any Funnel OTO Below
Front-End (FE): WP AI Engine ($19)
OTO1: WP AI Engine Unlimited ($47)
OTO2: WP AI Engine Pro ($37)
OTO3: WP AI Engine Max ($37)
OTO4: WP AI Engine Enterprise ($67)
OTO5: WP AI Engine DFY ($197)
OTO6: WP AI Engine Agency ($97)
OTO7: WP AI Engine Reseller ($197)
OTO8: WP AI Engine Whitelabel ($197)
WP AI Engine Review: Money Back Guarantee
Try Our 30 Day Money Back Guarantee Has Got Your Back!
We created WP AI Engine to offer our clients entire control over converting their basic WordPress into an extraordinary WordPress that sends emails, creates Google-friendly blogs, and sends targeted emails with three easy clicks. Try WP AI Engine risk-free for the next 30 days, and if you don’t like it, we will refund your money, period!
We cannot give a refund for this product due to its highly secret nature and the fact that the information will be released quickly once you open the software. However, if we are unable to resolve any technical concerns within 30 days of the product trial, we will give a refund. For additional information, please refer to our Refund Policy.
WP AI Engine Review: Pros and Cons
Pros:
All-in-one solution for WordPress
Unlimited usage – blogs, emails, funnels
Uses powerful AI for content, copy & designs
50k+ templates for every niche & business
Drag-and-drop builder – no coding needed
SEO, hosting, automation – included
No monthly or hidden costs
Cons:
Requires a one-time Price.
Requires stable internet connection.
Only works with WordPress (not for non-WP users)
Nothing wrong with it, it works perfectly!
My Own Customized Exclusive VIP Bonus Bundle
***How To Claim These Bonuses***
Step #1:
Complete your purchase of the WP AI Engine: My Special Unique Bonus Bundle will be visible on your access page as an Affiliate Bonus Button on WarriorPlus immediately after purchase. And before ending my honest WP AI Engine Review, I told you that I would give you my very own unique PFTSES formula for Free.

Step #2:
Send the proof of purchase to my e-mail “[email protected]” (Then I’ll manually Deliver it for you in 24 HOURS).
Frequently Asked Questions (FAQ’s)
Q. Do I need experience or tech/design skills to get started?
WP AI Engine was created keeping newbies in mind. So, it’s 100% newbie-friendly & requires no prior design or tech skills.
Q. Do I need experience or tech/design skills to get started?
WP AI Engine was created keeping newbies in mind. So, it’s 100% newbie-friendly & requires no prior design or tech skills.
Q. Do you provide a money back guarantee?
Absolutely yes. We’ve already mentioned on the page that you’re getting a 30-day money back guarantee. Be rest assured, your investment is in safe hands.
Q. Is step-by-step training included?
YEAH- WP AI Engine comes with step-by-step video training that makes it simple, easy & guide you through the entire process with no turbulence.
Q. Do you provide any support?
Yes, we’re always on our toes to deliver you an unmatched experience. Drop us an email if you ever have any query, and we’ll be more than happy to help.
Final Conclusion – Is WP AI Engine Worth It?
WP AI Engine is a revolutionary AI solution for WordPress users, offering unmatched automation for content creation, email marketing, and high-converting sales funnels. With features like unlimited AI-generated blogs, automated email campaigns, and one-click funnel building, it eliminates the need for multiple expensive tools.
Its user-friendly interface, SEO, and cost-effectiveness make it ideal for bloggers, marketers, and agencies. If you want to scale your online business effortlessly, WP AI Engine is a must-have tool in 2025. Don’t miss out; get it today and experience the power of AI automation!
🚀 Don’t miss out guys and start your journey with WP AI Engine today!
>>> Click Here to Get Instant Access WP AI Engine with Exclusive Bonuses <<<
Check Out My Previous Reviews: Creatixio AI Review, Traffix AI App Review, AI EngineHost Review, Audora AI Review, and Booklytic Review.
Thank for reading my honest “WP AI Engine Review” till the end. Hope it will help you to make purchase decision perfectly.
#wpaiengine#wpaienginereview#wpaienginediscount#wpaienginecoupon#wpaienginereviews2025#wpaiengineappreview2025#wpaienginebonusses#wpaiengineproduct#wpaiengineprice#wpaiengineotos#wpaiengineoffers#wpaienginebonus#wpaienginebuy#wpaiengineWebsite#wpaienginesite#wpaiengineapp#wpaienginehonestreviews#wpaienginelatestreviews#wpaiengineusersexperience#wpaiengineusersreview#wpaienginedemo#wpaienginetutorial#wpaienginepurchaseonline#wpaienginelegit#ai#aiapp#aiapps#aitool#aisoftware#sidehustle
0 notes
Text
What are some of the latest trends in ad film production that The Maverick Communications is utilizing?
Founded with a progressive vision, The Maverick Communications is an ad film production company that stays ahead of the trends in advertising and filmmaking today. The society, in this fast-changing digital world, realizes that commercial creativity can no longer exist in a vacuum without technology for commercial impact these days. With ad films meeting these pacing industry shifts, The Maverick Communications gives out not only eye-candy commercials but also strategically potent ones.
One trend adopted by The Maverick is virtual production, allowing realistic digital environments to be generated without the extensive logistics of real location shooting. LED walls and real-time rendering allow The Maverick Communications to shoot complex scenes in a controlled studio environment, simultaneously reducing costs and turnaround time. The much happier by-product of such an approach is free-thinking creativity, where directors and clients can set up scenes and adjust them in real-time on the set for refined creative outcomes.
Another mega trend the company exploits is AI-infused post-production. Artificial Intelligence tools expedite core post-production functions such as editing, colour grading, and sound mixing; thus, The Maverick Communications can slip the production timeline with cinematic value. Added benefits are that these tools suggest workflows and automate redundant tasks, allowing editors to engage more deeply in the realms of storytelling and creative direction. This makes the turnaround faster than ever, ensuring that clients' polished high-quality content reaches them.
With consumer behaviour changing, The Maverick Communications is also producing content that is more optimized for the platforms used by the targeted audience and its potential consumers. Nowadays short video formats receive maximum interaction on Instagram, Tik-Tok, and YouTube. Bite-sized mouthfuls of ad films are artistic and platform-specific, and The Maverick utilizes the behaviour of the audience on a specific platform and format creativity to send its messages in seconds. Such ads grab attention within less than a second, and even the design goes fast, and all is taken care of so that they maximize impact and share ability.
The Maverick Communications has also embraced sustainable production in line with the global movement to restricting environmentally harmful advertising. By limiting waste on set, utilizing energy-efficient equipment, and adopting digital production instead of printed materials, the company lessens its carbon footprint. The ad thus produced strengthens their brand and their clients and strikes a chord with consumers interested in ethical values. The Maverick Communications now prides itself on being a trend-forward ad film production house that celebrates innovation, responsibility, and creativity.
0 notes
Text
Why Wix websites are an ideal way to get started online with a platform that will grow with you and offers a great framework to build your knowledge. What is Wix? Wix is a cloud-based web development platform that enables users to create, design, and publish custom websites without the need for coding skills. It was founded in 2006 by Avishai Abrahami, Nadav Abrahami, and Giora Kaplan. Wix is headquartered in Tel Aviv and is publicly traded on the NASDAQ. The company's CEO is Avishai Abrahami. Pros of using Wix include ease of use, customisable templates, a wide range of features and integrations, and affordability. Cons include limited design flexibility, limited functionality compared to other website builders, and limitations on the number of features available in the free version. Wix is a solid free website builder that’s perfect for anyone looking to create a professional-looking website. Wix has over 200 million users, making it one of the most popular website builders out there. What is Wix.com used for? It is a user-friendly platform that allows users to create a wide range of websites, including personal portfolios, online stores, business websites, and more. With Wix, users can choose from a selection of customizable templates, add various features such as forms, social media integrations, and blogs, and publish their website with just a few clicks. Here are some scenarios where Wix excels: Small to Medium-sized Websites: Wix is ideal for small to medium-sized websites that require a basic or intermediate level of functionality and design. Easy Website Building: Wix's drag-and-drop editor and wide range of templates make it easy for users with little to no technical expertise to build and launch a website. Ease of Use: Wix is known for its ease of use and user-friendly interface, making it a great choice for beginners and non-technical users. Budget-Friendly: Wix offers a range of pricing plans, including a free plan and premium plans at affordable prices, making it a budget-friendly option for many users. Wide Range of Features: Wix offers a wide range of features, including e-commerce, blogs, forms, and more, making it a comprehensive solution for many types of websites. Mobile Responsiveness: Wix's templates and designs are optimised for mobile devices, ensuring that your website will look great and be easily accessible on all devices. Fast and Reliable Hosting: Wix provides fast and reliable hosting for all websites built on its platform, ensuring that your website will be accessible to users at all times. These are some of the scenarios where Wix excels. Whether you're a small business owner, freelancer, or hobbyist, Wix offers a user-friendly platform and a wide range of features to help you build a professional and functional website. Building a website with Wix Here are the steps to build a functioning 5-page website on Wix.com: Sign up for a Wix account: Go to Wix.com and sign up for a free account. Choose a template: Select a template that best fits the type of website you want to create. You can choose from a wide range of templates in different categories, including business, personal, portfolios, and more. Customize your template: Use the Wix Editor to customize your template by adding text, images, videos, and other elements to your pages. You can also change the layout, colours, fonts, and other design elements. Add pages: To add pages to your website, click the "Add Page" button in the Wix Editor and select the type of page you want to create. You can add up to 500 pages to your Wix website. Add features: Wix offers a wide range of features that you can add to your website, including contact forms, blogs, online stores, and more. To add a feature, go to the Wix App Market and select the feature you want to add. Publish your website: Once you have finished designing and customizing your website, click the "Publish" button to make your website live and accessible to the public.
Optimize your website for search engines: Wix offers built-in SEO tools, but it's important to optimize your website further to improve its visibility in search engine results. This includes adding page titles and meta descriptions, optimizing images, and adding relevant keywords to your content. These are the general steps to build a 5-page website on Wix.com. Depending on the complexity of your website and the features you want to add, the process may take a longer or shorter time. However, Wix provides a user-friendly platform and a wide range of resources to help you build and publish your website with ease. Add comment forms to Wix By default, commenting on a Wix blog requires visitors to log in using a Wix account, Facebook, or Google. However, if the website owner has enabled the option for visitors to comment without logging in, then visitors can simply enter their name and email address and submit their comments. If you're a website owner using Wix and would like to allow visitors to comment on your blog without logging in, you can do so by going to the Blog Manager in your Wix Editor and selecting the "Settings" tab. From there, you can turn on the option for "Allow comments without logging in." It's important to note that allowing visitors to comment without logging in may increase the risk of spam comments and could potentially harm your website's reputation. As a website owner, it's recommended to regularly monitor and moderate your blog comments to ensure the content is appropriate and relevant. Creating Wix.com member sites To create a login page in Wix, you can use the Wix Members App, which is a built-in app for creating membership websites with protected pages and user accounts. Here are the steps to create a login page: Add the Wix Members App to your website: Go to the Wix App Market, search for the Wix Members App, and click "Add to Site." Set up your membership options: In the Wix Members App, configure your membership options such as sign-up and login settings, protected pages, and user roles. Create a login page: In the Wix Editor, add a new page to your website and select the "Login" page type. Customize your login page: In the Wix Members App, you can customise the design and content of your login page, including the page layout, text, colours, and images. Publish your login page: Once you have customized your login page, publish your website to make it live and accessible to visitors. It's important to note that the exact steps may vary depending on the version of Wix you are using. If you encounter any difficulties, you can refer to Wix's support resources or reach out to their customer support for assistance. Wix.com and SEO Wix has made improvements to its SEO capabilities in recent years, but it still has limitations compared to other website builders and traditional website development. Some of the pros of Wix for SEO include a clean and organized HTML code, built-in SEO tools, and the ability to customize page titles and meta descriptions. However, there are also some cons to using Wix for SEO, such as limited control over URL structure, limited ability to optimize content for specific keywords, and limited options for creating and optimizing landing pages. Additionally, Wix websites can sometimes load slower than those built with other platforms, which can negatively impact SEO. In conclusion, while Wix can be a good choice for basic SEO optimization, more advanced SEO efforts may require a more robust platform or custom website development. It's always a good idea to consult with an SEO expert to determine the best approach for your specific needs. What is Wix.com Premium Plan? Wix.com offers several premium plans that provide additional features and benefits compared to the free plan. The Wix premium plans include: Combo Plan: This plan includes more storage and bandwidth, as well as a free domain name for one year. Unlimited Plan: This plan provides unlimited storage and bandwidth, as well as a free domain name for one year and access to premium support.
Pro Plan: This plan is designed for professionals and small businesses and includes features such as custom logos, social media integrations, and the ability to sell products online. VIP Plan: This plan provides priority support, advanced site statistics, and access to Wix's exclusive VIP services. Each of these premium plans includes various levels of e-commerce functionality, website analytics, and the ability to remove Wix branding from your site. The exact features and benefits offered by each premium plan vary, so it's important to carefully review the features and pricing of each plan to determine which one is best for your needs. What scenarios are there where Wix would be no good? Wix is a popular website builder that offers a simple and user-friendly platform for building and hosting websites. However, there are certain scenarios where Wix may no longer be appropriate for a project: Complex or Custom Websites: If you require a complex website with custom features and functionalities that are not available through Wix's platform, you may need to consider alternative solutions. Large-Scale Enterprise Websites: Wix may not be suitable for large-scale enterprise websites that require a high level of security, performance, and scalability. Advanced Customization: If you need advanced customization options and full control over the HTML, CSS, and JavaScript code of your website, Wix's platform may not be able to meet your needs. E-commerce: While Wix offers an e-commerce solution, it may not be suitable for large-scale online stores with complex requirements and a high volume of transactions. Mobile App Development: If you need to develop a mobile app, Wix may not be the right solution as it is primarily focused on website building. These are some of the scenarios where Wix may no longer be appropriate for a project. However, Wix offers a wide range of features and integrations to meet the needs of most small- to medium-sized websites and businesses. What other companies does Wix.com own? Wix has acquired several companies and technologies over the years to enhance its platform and offerings. Some of the notable acquisitions by Wix include: DeviantArt: Wix acquired the popular online art community, DeviantArt, in 2017. OpenRest: Wix acquired OpenRest, a cloud-based restaurant ordering and delivery platform, in 2014. Flok: Wix acquired Flok, a customer engagement and loyalty platform, in 2017. These acquisitions demonstrate Wix's commitment to providing a comprehensive platform for website building and digital marketing. This article was first published on AIO Spark: https://www.aiospark.com/build-a-website-with-wix?utm_source=Tumblr&utm_medium=fs-share&utm_campaign=auto-social
2 notes
·
View notes